Saturday, August 30, 2014

Skirting The Issue: Two Kinds of Cotton Skirts

So here are the first of the skirts I've been working on. I was given a donation to buy supplies for this year's project, (I won't lie, it was my mom) so I had some really cute prints to work with, They were nice enough that I just went with a simple skirt pattern. You know, side seam, hem and waistband then insert the elastic. Easy peasy.


! made eight this way. The sizes vary from about a size 4T to an adult small.


These two are actually refashions. They were tank tops with elastic bodices. I cut off any unnecessary parts such as straps, folded the top in half and stitched it to the inside seam where the bodice and the main piece meet.


Like so. (In case that explanation made no sense.) Those ones where the easiest of the lot.


So that puts the count at nine skirts so far. Stay tuned on Monday for the rest of them!

P.S. Did you sew any skirts? <3


Wednesday, August 27, 2014

Play room

I need some inspiration...

oh blogger, why must you rotate my photos..


 Our play room needs some loving.

Monday, August 25, 2014

Dance Pants

Isn't that little bow pretty? It also manages to be practical too, what an overachiever!


I started these pants ages ago, when the waistband of my leggings died. Since they were actually supposed to be workout pants, and I had the skirt from a cheap dance costume lying around, I just sandwiched that in when I made the new waistband and figured I was good to go. It looked like this (below), minus the two bits of ribbon. All was well until I actually wore them and the skirt was completely in the way during the warm-up. So they sat, lonely and neglected in the refashion pile until inspiration struck.


Ta-da! So simple. Sew one piece of ribbon to the waistband and another just below but under the skirt. Repeat, two in front and two behind. Gather and tie with bows for the warm-up, take them down and cover the dangling ribbons with a hip scarf while dancing. Problem solved.


Now I have something new and pretty for when classes start again for the year. I had so much fun costume making this year that I'll have to spend some time now and then making some pretty things for class too. Because everything should be pretty, right?

Friday, August 22, 2014

Sweatshirt Number Two: The Girly Version

So I had a brand new sweatshirt from Travis that was a bit too small for him, black of course, that had been sitting in my re-fashion pile waiting for inspiration to strike. (I have been attacking my mending/re-fashion pile with a vengeance which has still meant plenty of sewing but most of it is not exciting.) I was so happy with my last effort that I decided I needed another girly sweatshirt. So I searched Pinterest for "girly sweatshirt" and was completely disgusted by the number of weight-loss slogan sweatshirts that came up.  I did find a few useful ideas though, and this is what I came up with from them.


The shirt that mostly inspired it is here. I toned it down a bit and I think mine ended up looking a bit tuxedo-ish due to the colours but I still like it.


The bows are made from the original sleeve cuffs. I left the sleeve edges raw since they were the perfect length. I also moved in the shoulders and then flared it out from there to the original hem.


This was another irrationally hand sewn project. I'm fairly sure that's out of my system now though. The only thing that sucks about this... is that it doesn't fit me. I measured the sleeves wrong and had to take in the top to compensate and now it's too tight for me to get on comfortably. I know me, if it's a pain to put on it will sit neglected in my closet. So I've been mulling over whether I should undo the side/underarm seam and insert a strip of fabric (maybe black lace? I'm not sure how that would look though.) or if I should just throw in the towel and offer it to one of my more petite friends. Any thoughts?

Wednesday, August 20, 2014

Katie Dragon, age four

My little girl turned four the other week, and what did she wish for for her birthday? Why a dragon and a trampoline of course. I was afraid that after all of the work we did de cluttering our old house, we would arrive in Ontario, just to celebrate Katie's fourth birthday and be bombarded with un needed toys and such. This thankfully wasn't the case. When a little girl wants something badly enough, people tend to listen. Katie received many cash gifts, which added with our leftover Christmas money and mommy and daddy picking up the rest of the tab, resulted in a really cool trampoline. I know a few people with spring free trampolines, so it came well recommended despite the price tag. It was a pain to put together, but we all love it. It's even good for lying on at night to look at the stars. I have to admit, we didn't stay out long as I was afraid that the skunk might find us unarmed and unable to escape... so, onto the dragon...

Elijah's Aunt asked his mother what Katie was into, naming off the "normal" girly things : Barbie, princesses, polly pocket... My mother in law, being awesome as she is, said "Well actually, she likes dragons." So not only did Katie receive a surprise joint birthday party with Nanny and Michelle, she also got to blow out four candles on a really cool dragon cake. If I find a picture I will post it later, it was something special <3.

Now, for her gift from Mamma bear, I granted her Dragon wish and using this tutorial, I made Her a Night Fury, which she named Katie and quickly declared that it was four years old.


 She adores her dragon, and that makes this crafty mamma super happy.

Friday, August 15, 2014

Pretty Sweatshirt Refashion

I was given this soft, great fitting purple sweatshirt probably about two years ago. I liked everything about it, except for the giant logo stitched across the front. That bothered me so much that I probably only wore it twice before taking my seam ripper to that logo. Which was unfortunately sewn on very well, leaving me with a dozen tiny little holes across the front... but hearts fix everything right?


I love sweatshirts for their comfort factor but always feel frumpy in them. I doubt that will be a problem this time!


This was just a bit of scrap material I had left over from a woven t-shirt I made about a year ago. I used every bit of it except for what I cut off around the hearts. I love it when things work out like that!


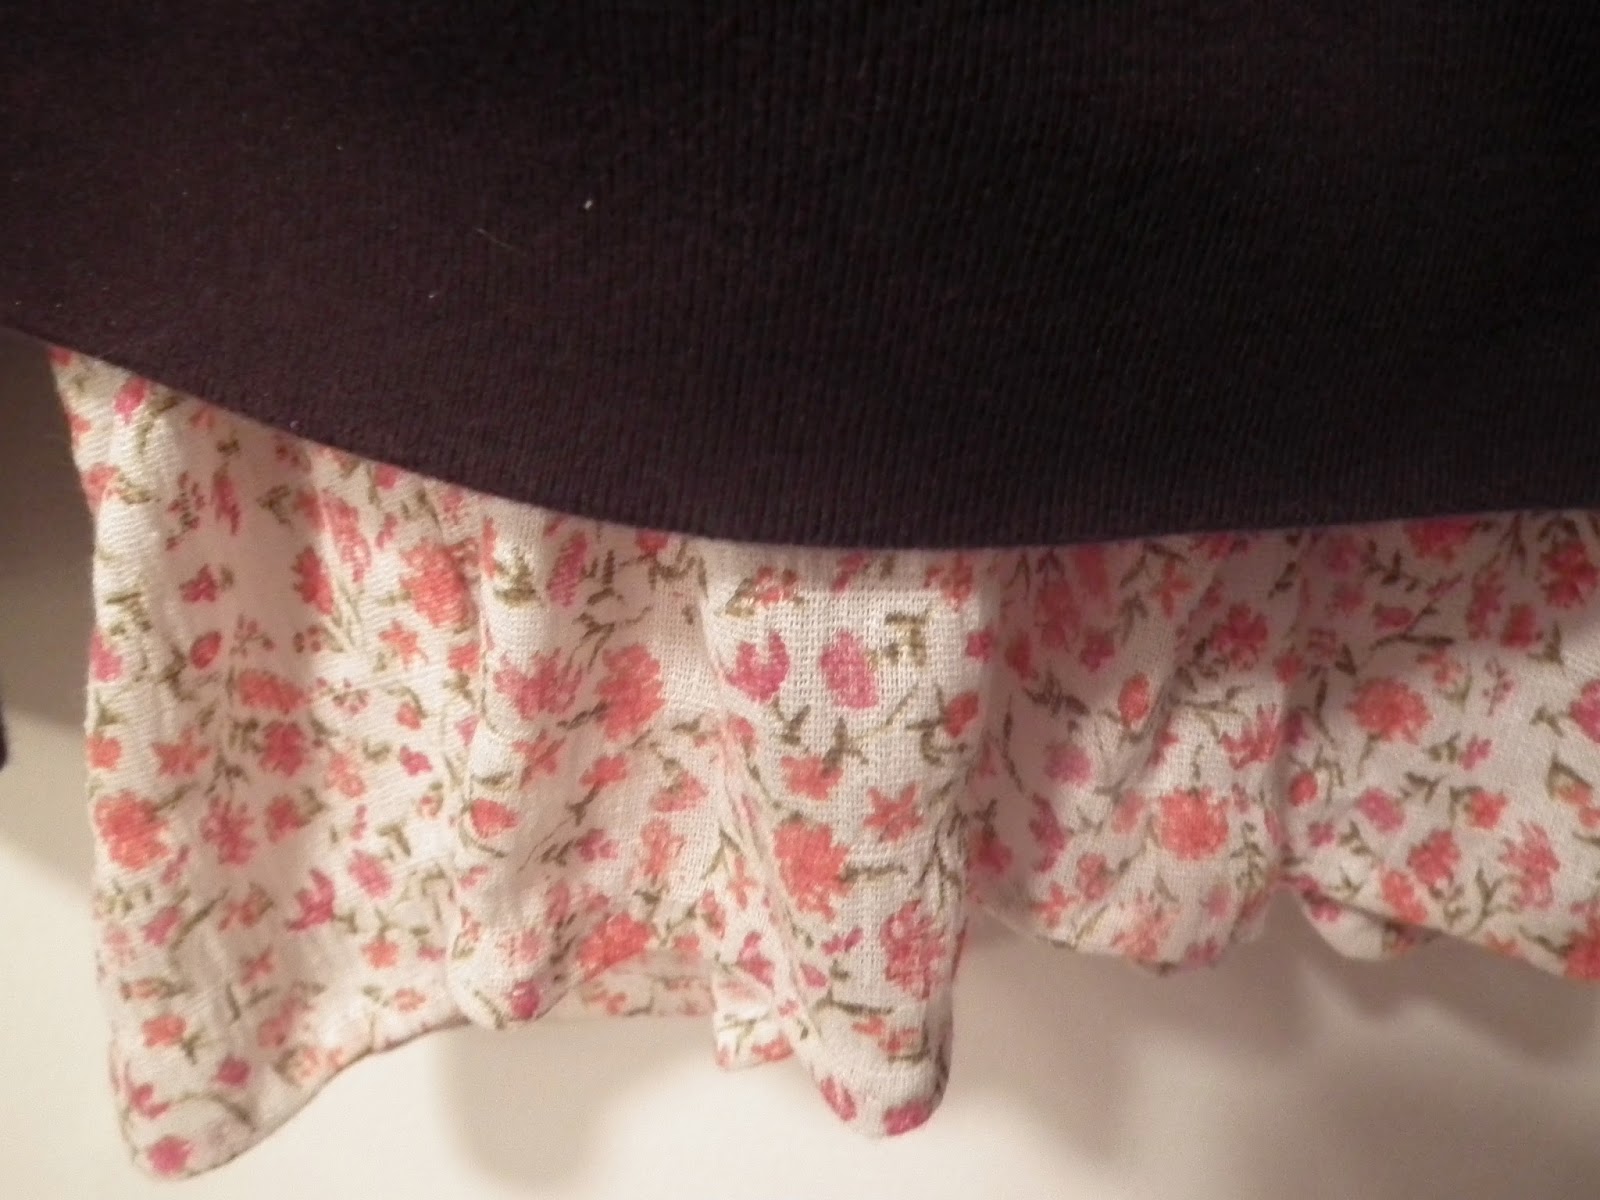
I especially love the way the bottom ruffle drapes. You can see here that I didn't attach it to the ribbing at the bottom, but to the seam inside where the ribbing meets the sweatshirt. This makes the ruffle flow better and was a more stable part to be sewing a woven fabric to, since it wasn't as stretchy.


An interesting fact about this sweatshirt is that I did all of the sewing by hand. Not for any particular style or logistics reason, I was just in a strange mood where I really felt like sewing but had no interest in pulling out my machine.

 It was probably a reasonable choice for the heart applique but definitely not logical for the ruffle which needed all of it's seams enclosed due to the loose weave of the fabric.

Whatever, it amused me.


Did you notice that I finally found a white wall to take pictures against? If by wall I mean "bathroom door which happens to be the only vertical white surface in my apartment". It's nice to have another option for gloomy days though, because the dresser isn't much use when it's dark out and outside obviously has, you know... weather.

So the door has three options; inside the door and too bright (above), outside the door and too dark to use or outside the door with it half open which gives a pretty effect but not as clear of a picture. Options are good though.


P.S. Remember the pink jeans from this post? The ones that I took in but that were a bit too tight? Well, I found the solution and it's going to blow your mind. I wore them. Only took me two months to have the thought that all of my jeans are a bit too tight out of the dryer, if not they start falling down halfway through the day. Ten points, I know. ;)

Monday, August 11, 2014

Painted Bike Trailer

So I was incredibly fortunate to get a bike trailer for FREE a couple of weeks ago! This is huge because my bike has been out of commission since I was about 7 months pregnant with Deacon and it decided to be winter. After that I had one bike seat and two kids, so my poor bike has been sorely neglected. Now, the trailer was not exactly beautiful or else it would not have been free. So here is what I had to work with:


Faded to almost nothing and a few minor rips. Nothing that duct tape couldn't fix though. Like my little heart patches on the window?


The bar that connects it to the bike was a bit rusty and I was having issues with the purple and yellow together. I'm OCD that way. So I decided the purple had to go and took some sandpaper to it.

My colour and pattern choices were mostly based on how much paint of certain colours I had as well as what colour I was trying to paint over. So I came up with... oranges!


I kind of wish I'd used a darker shade of green for the leaves, my oranges look more like polka dots from a distance. Here's a better look at my amazing painting skills (not! lol!)


I used your basic acrylic craft paint mixed with textile medium since the trailer seems to be nylon. You're supposed to let it sit for a week and then heat set the paint. I think I'll have to take a hairdryer to it very, very carefully. I don't want to cross the line between setting the paint and melting the nylon! You can see on the left where I painted over one of my duct tape patches. We'll have to see how that holds up.


Here is the new and improved (not purple) bar. I'm a little less certain about how this will hold up. I did a few things unconventionally with this part. I didn't use a metal primer because I didn't have any and there is textile medium mixed into the paint. It does have a couple of layers of top coat though, so we'll see. I'll post an update sometime in the future to let you know how the different paint jobs held up, just in case anyone else wants to try it.


Is it silly? Yes, but I figured why not? It's not like I could make it look any worse than it already was! Besides, Guelph is full of hippies, I'll blend right in ;)

P.S. Full disclosure if you plan on trying this yourself; it took FOREVER. I'm talking about an entire afternoon. All of the individual oranges and leaves and going around the edges for the blue...plus everything needed two coats to keep the colours underneath from bleeding through. Solid colours would go much faster if you're just looking to brighten up faded fabric.

Friday, August 8, 2014

Citrus-y Summer Shorts set

So it only took me half the summer, but I have finally finished Deacon's little shorts outfit!


Getting pictures of it was another story...


Here's a kind of gloomy picture of just the top. At least it's not in motion in this photo though!


Here's the cute little shoulder buttons, probably my favorite part! The pattern is form the book Candy Crochet, which I accidentally acquired by checking it out from the library, losing it, paying the replacement fee and then finding it again. The original is actually very nautical. with red where I used orange and thinner navy stripes. I had planned on doing the same until I got to the yarn store and saw these colours together. I just love dressing this kid in yellow and orange, it looks so cute on him and his sister and I don't have the colouring to pull it off. The yarn is Bernat Cotton-ish in "cotton ball", "lemon twill" and "cotton harvest". I used one ball of each, more for cost reasons than style ones but I love how it ended up! The wider yellow stripes meant there was just enough white left over to use for the waistband of the shorts. (That isn't part of the pattern, I was just running out of orange!)


The waistband looks kind of scrunchy because this is a bit wide for him still. My biggest problem with this pattern book is that everything in it is short and wide.I don't mean that as a criticism, the author says she made these patterns for her grandchildren to wear. As Mama to a kid who did not fit into average sizes very well, any patterns I create are modified to my kids shapes as well. (You can tell that the shapes are off in the book by looking at the models. In many cases their wrists are sticking way out of their sleeves.) So this meant modifying the pattern, but at least I knew it was coming. The first thing I made out of this was a pair of baby dresses for Sophie and Katie's first Christmases. I believe Katie just grew into hers. So I kept the length of the 18 month size and used the 6 month width. It still turned out wide enough for a 2T wearing, cloth diapered little toddler bum. 


Deacon's new favorite thing is knocking on doors. Which is adorable, unless I'm in the bathroom. ;)

Friday, August 1, 2014

Pandas! Rainbows! Undies!


Aren't these adorable? I wish I was 4! I used the undies pattern from The Red Kitchen. (The link is here but it looks like you can't buy this pattern anymore.) I made the 4T/5T size and used some cute t-shirt scraps. This is definitely what I'm doing with all of the kid t-shirts that end up wrecked from now on!


This was a nice easy pattern. The instructions have you zigzagging the top elastic casing but I only did that on the front of the panda pair. For everything else I used the existing hems of the shirts and just cut my elastic in half so I could thread it before sewing the side seams. You can see below how much nicer it looks. (I love cheating that way, go t-shirt refashions!) I may try adding the white trim to the waistband as well next time.


The only problem I had was that I brilliantly stuck my finger too far in and sewed myself half-way through. I made my husband run around the house after the tweezers and then hopped around in front of him refusing to let him pull the needle out. (I did it myself. Travis was highly amused. I push out babies without drugs but if I get so much as a splinter I am an enormous wuss. Go figure.)

Oh, I almost forgot! My favorite part of this pattern is that they have you fold over a little piece of the white t-shirt and sew it in the back as a tag. (We grown-ups can tell from the shape of a garment which way is front but that's a lot to expect from the littles.)

Possibly not the most glamorous thing to sew but I'm finding that Sophie's store bought ones are already disintegrating  and she hasn't even grown out of them yet. I'll have to whip up a couple more pairs for her. What, what? Who are they for then? They're part of Katie's birthday present. Four because she will be four :) I have a couple of other fun little things to tuck in with them, some dragon stickers and these paper dolls, but undies are still amusing at 4.

Shh... don't tell, she hasn't seen them yet ;)